GREEN & WHITE SOCCA PIZZA by Lindsey | Dolly and Oatmeal


happy first spring friday! that feels so good good to type :) . even if it’s still chilly, and there’s little-to-nothing sprouting, the beginning of spring feels like such an exciting time - full of possibility and hopefulness. but it’s also a time where you’re still craving something warm and cozy, that’s also light and refreshing. this is where this green socca comes in.

i find socca to be the perfect canvas for about any topping, and for every season. in the winter you can pile it next to a hearty soup or stew; summer it can be served with a big garden salad; autumn paired with roasted vegetables; and spring served with everything green! i’ve been making socca for such a long time that i’m surprised it never occurred to me to bulk its’ nutritional value up by adding a handful of greens to the mix. i’ve been working with a nutritionist here in LA for a while, and her approach to creating a balanced lifestyle is keeping your blood sugar in check. i find that my mind is clearer, when i limit my carb intake. but every few weeks we make pizza, and i if i can sneak everything in a pie that keeps me thriving, and my blood sugar in check (with a few carbs thrown in there) then i’m ok. so here we have it: a socca that’s full of protein, healthy fats (we add olive oil), fiber, and greens!

i love the pure ease in a meal like this. the batter gets thrown in a blender (or food processor), rests for 30 minutes-1 hour. then partially cooked, topped, cooked again, and served. it’s one of those cornerstone meals; whether your’e making it into a pizza, throwing a salad on top, serving it beside breakfast eggs. it has the ability to be whatever you need it to be, for whatever meal you need it for.

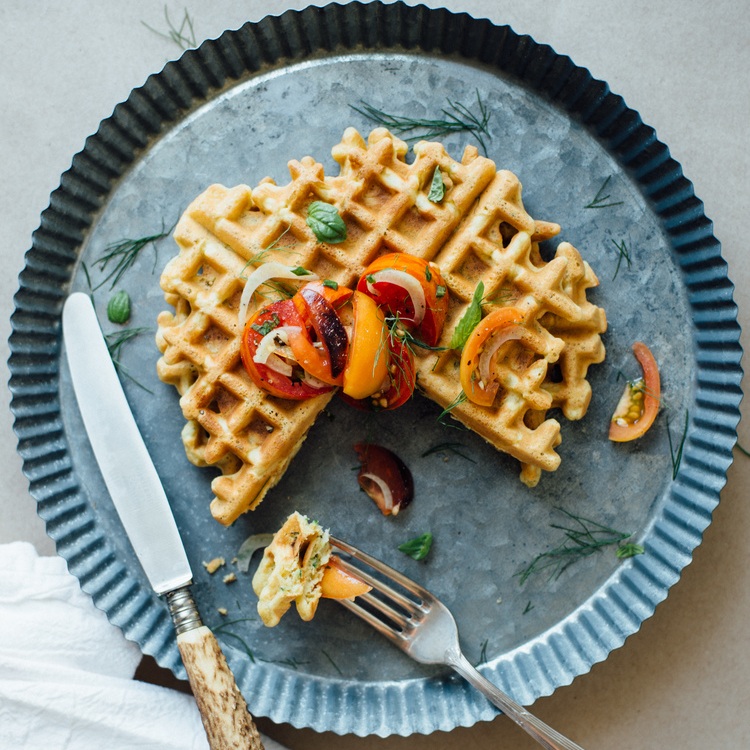
but here we’re making pizza, because if fridays and weekends aren’t a good time for pizza, then i don’t know when is! this pizza is topped with a vegan ricotta cheese, wild arugula, shaved red onion, pine nuts, olive oil, chives, and flaky sea salt. i’m not sure what flavor profile i was going for, but it all works out in the end for a seriously tasty combination. i hope you get the chance to make this one, i think you’ll really love it :)

xo!


green & white socca pizza | gf & v

  • while socca batter can be made ahead of time, cooked socca is one of those dishes best served fresh. whenever i reheat leftovers, they tend to dry and disappointing, not inedible, but not the best. so unfortunately this isn’t a pizza i would advise you freeze and reheat.

  • feel free to use whatever toppings you prefer, but i would advise you not to use any cheese that’s too milky or watery, like a burrata for example.

print the recipe

| makes one 12-inch “pie” or 8 slices |

green socca

  • 1 cup chickpea flour (also called garbanzo bean flour)

  • 1/2 cup baby spinach

  • 1/2 cup mixed chives and parsley

  • 1 cup water

  • 4 tablespoons olive oil, divided

  • 1-2 cloves garlic, smashed

  • 1 teaspoon salt

  • fresh ground pepper, to taste

toppings:

  • vegan ricotta or mozzarella (for ricotta i like kite hill brand, and for mozzarella i use miyoko’s brand)

  • 1/4 cup baby arugula, divided

  • 1/4 small red onion, sliced paper thin

  • 1 tablespoon pine nuts

  • olive oil, for drizzling

  • 1-2 teaspoons chopped chives (optional)

  • flaky sea salt


method

  1. in a blender or food processor, combine the flour, spinach, herbs, water, 2 tablespoons olive oil, garlic, salt, and pepper. whiz on high until the batter is a vibrant green color, scraping down the sides as needed. pour the socca batter into a large bowl, and let it rest for 30 minutes-1 hour.

  2. 20-30 minutes before you cook the socca, place a 12-inch cast iron skillet in the center of your oven (rack should be placed in the middle). and preheat oven to 400°F with the skillet inside.

  3. remove the skillet from your oven and pour in the remaining 2 tablespoons of olive oil, carefully swishing it around to make sure it covers the bottom of the pan evenly. then pour in the batter, tilting the pan to spread the batter evenly across the pan. place back in the oven and cook for 8-10 minutes, until cooked through, but not browned.

  4. remove the socca from the oven and turn the heat up to 500°F. top socca with arugula, ricotta, shaved onion, and pine nuts. drizzle the top with some olive oil and place back in the oven (by this time your oven should have come to temp., if not, wait until it has). cook socca for another 5-8 minutes, until edges are browned, onions are soft, and nuts are toasted. remove from the oven and let cool for 5 minutes.

  5. slice the socca pizza into 8 pieces and serve with the remaining arugula, chopped chives, and another drizzle of olive oil. finish the pizza with a sprinkle of flaky sea salt, if desired, and serve immediately.


similar recipes:


socca salad

socca salad

super simple spring green broth w/ soba noodles

spring onion + pea tendril flatbread

spring onion + pea tendril flatbread

(GLUTEN-FREE) YEASTED CINNAMON-BLUEBERRY WAFFLES by Lindsey | Dolly and Oatmeal


i might as well let you know that from this day until i give birth probably, i’ll be sharing recipes that i can’t live without while being pregnant. (sorry, not sorry.)

waffles have taken up quite the real estate in our fridge and freezer, there are homemade versions, frozen store-bought varieties, and i simply can’t get enough. add berries to the mix and i’m literal putty in your hand. i’ve always wanted to attempt a yeasted waffle since i didn’t really think it made that much of difference when it came to gluten-free waffles. whenever i had looked over recipes for yeasted gluten-free waffles they looked very similar to a regular non-yeasted waffles, so i didn’t think to bother with it. but i think because my obsession with waffles is what it is at this point, i wanted to give it a go. and i’m so happy i did.

what i didn’t realize when it came to yeasted gluten-free waffles is that you don’t get this super puffy, belgian-like waffle. but what you do get is major texture! the insides are puffy, and light, and are wonderfully tender. it’s something i didn’t think was achievable in gluten-free cooking/baking. i tested an overnight version of these waffles, but i preferred the 1-hour proof of the batter. plus, it’s a bit easier than remembering to prep the night before (at least for me!). i know we’re not remotely close to summer (one can dream), but i’m a sucker for blueberry waffles, especially with a bit of cinnamon in the mix as well. the flavors are subtle, but delicious, especially with all the toppings ☺️

love & waffles, friends! xo


(gluten-free) yeasted cinnamon-blueberry waffles | gf & df

  • these waffles are best for an early riser, or for a weekend brunch situation since they take about 1 hour of prep, they require a bit of forethought.

  • feel free to substitute any fruit or spice you prefer. i could easily see a strawberry and cardamon combo, or if you want to get fancy, a roasted rhubarb and ginger number - whatever strikes your fancy!

print the recipe

| makes 10 large waffles |

  • 2 cups unsweetened almond milk, warmed to 110-115°F

  • 1 tablespoon honey

  • 1 packet yeast (2 1/4 teaspoons)

  • 1 3/4 cups fine brown rice flour

  • 1/4 cup arrowroot powder

  • 1/4 cup melted coconut oil

  • 1 teaspoon salt

  • 2 large pasture raised eggs, beaten

  • 1 teaspoon ground cinnamon, plus more for topping

  • 1 teaspoon pure vanilla extract

  • 1/4 teaspoon baking soda

  • 1/2 cup fresh blueberries, plus more for topping

  • maple syrup, for serving


method

  1. whisk together the warmed almond milk, until the honey is dissolved. sprinkle the yeast over top, and let it sit until bubbly and puffy, about 10 minutes (if your yeast doesn’t proof, start the process over with another yeast packet). whisk in the brown rice flour, arrowroot powder, oil, and salt, until the batter is smooth. cover the bowl with a clean dishtowel and place in a warm area of your house, until the batter puffs up, about 1 hour.

  2. preheat your waffle iron to medium-high (my waffle iron has a heat dial from 1-5, and i usually use it on a 4 or 5). preheat oven to warm, place a baking sheet inside (this is to keep your waffles warm once they are finished cooking).

  3. into the flour and yeast mix, add in the eggs, cinnamon, vanilla, and baking soda; then fold in the blueberries. grease your waffle iron (if need be), and scoop about 1/4-1/3 cup batter into the center of your waffle iron. cook for roughly 2-2 1/2 minutes, until lightly golden, and edges are lightly crisp. place cooked waffles in your warm oven, making sure to not stack them (this makes them soggy). repeat with remaining batter.

  4. serve waffles with extra blueberries, a few dashes of cinnamon, and warm maple syrup. waffles with keep in the fridge for up to a week, or in the freezer for up to 2 months.


similar recipes:


zucchini-basil chickpea pancakes

zucchini-basil chickpea pancakes

super seed power pancakes

super seed power pancakes

overnight oat waffles w/ lemon zest & poppy seeds

overnight oat waffles w/ lemon zest & poppy seeds

SUMAC-ROASTED VEGGIES W/ TAHINI YOGURT (+ SOME NEWS!) by Lindsey | Dolly and Oatmeal


we’re just gonna start with the news, because i’m so excited to finally share it with you! 🎉WE’RE HAVING A BABY!🎉 baby love #2 is on the way, and HE(!!!) is due late this summer!! another little guy will be making us a family of 4 (5, if you’re like us, and count your pup as a child) and while initially i was in a state of shock at the thought of another boy, i am so excited at the idea of he and amesy being best little buds. we thought for sure that it was a girl. i had it all figured out that between both of our immediate families, the siblings have been girl/boy. this will be the first on either side where there are 2 boys. so it just goes to show that genetics only go so far, i suppose.

this pregnancy has been pretty good to me so far. my first trimester was all nausea all the time, but aside from that it was quite easy. and i’m so grateful. i never shared this before, but during my first trimester with amesy i was put on bed rest for about 6 weeks. i had a subchorionic hemorrhage, which is essentially an active bleed in the gestational sac. it was quite sizable and the bedrest was to prevent the hemorrhage from rupturing. it was probably the scariest thing i have ever gone through, but thank goodness amesy made it out of that first trimester, and i went on to have a very healthy pregnancy after that. needless to say, this time around i was was convinced it would happen again (apparently it’s common to have it again if you’ve had it before), but luckily we made it through this first trimester with zero sign of any bleed.

with all the worry of the first trimester aside, my mind is feeling a bit more at peace. we’re beginning to plan some things, some for baby, but mostly for amesy. i’m trying to think of everything i can to make this as easy a transition for him. which has translated to him moving into a big boy bed, starting the beginnings of potty training, and all that fun stuff! but in all honesty, i worried about so much in my pregnancy with amesy, that this time around i’m really just trying to take it all in stride, and just grateful for every day that i get to carry and care for this babe.

so where am i going with all this? and why am i celebrating this news with roasted veg? basically because i haven’t been able to stomach roasted anything for close to 3 months, and i’m finally able to enjoy roasted veggies once again. and more than that, i paired my favorite medley of fresh veg with my ultimate go-to (pregnant or not): dairy-free tahini yogurt. it’s the kind of sauce that you want to pour over everything, sop up with any scrap of bread you can find, or just eat it with a spoon. it’s that good. and if you’re on the other side of the world where it’s still hot and you have a plethora of tomatoes and cucumbers you could make this version that i posted the other day on instagram. like i said, the possibilities are endless with this sauce.

wishing you all a beautiful week ahead!


sumac-roasted veggies w/ tahini yogurt | v & gf

you could use this sauce in so many applications, but my favorite for this time of year is to brighten up roasted winter vegetables. there’s a good bit of punch and tang in the sauce, so it’s the perfect thing enliven winter meals (especially late winter meals). i used baby potatoes, red onion, and a mix of broccoli and romanesco, but feel free to use your preferred assortment of vegetable, you really can’t go wrong.

here are my favorite brands of dairy free yogurt to use here:

print the recipe

| serves 4 |

tahini yogurt

  • 1/3 cup tahini

  • 3/4 cup plant-based unsweetened plain yogurt (preferably greek-style)

  • 1-2 tablespoons fresh lemon juice

  • 1 clove garlic, grated on a microplane

  • salt

  • water to thin

sumac-roasted veggies

  • 1 lb. new potatoes or fingerling potatoes, cut into 1-inch pieces

  • 1 red onion, cut into 1/2-inch wedges

  • 3 tablespoons avocado oil, divided

  • 3 teaspoons ground sumac

  • salt & fresh ground pepper

  • 1 head broccoli or romanesco (or 1/2 broccoli, half romanesco), cut into bite size pieces

  • 1 tablespoon finely chopped mint

  • 1 tablespoon finely chopped parsley

  • crumbled vegan feta or mozzarella, to top


method

  1. make the tahini-yogurt. in a large bowl, whisk together the tahini, yogurt, 1 tablespoon lemon juice, garlic, a few pinches salt, a few grinds of pepper, and 1 tablespoon water. taste and add more lemon juice, salt, and water if needed. (if you’re looking to smear the bowl with the yogurt sauce, then i would suggest not adding as much water, you want it thick enough for it not to run down the sides of the bowl.) pour the sauce into a lidded jar or container and store in the fridge for up to 1 week.

  2. roast the veggies. preheat oven to 400°F, and line baking sheet with parchment paper. in a large mixing bowl, combine the potatoes and onions with 1 1/2 tablespoons oil, 1 1/2 teaspoons sumac, and a fat pinches of salt. toss together until everything is even combined. spread the veggies out evenly into the baking sheet and bake for 35-40 minutes (the potatoes will be lightly golden). while the potatoes and onion are cooking, add the broccoli or romanesco to your mixing bowl, and add the remaining 1 1/2 tablespoons oil, 1 1/2 teaspoons sumac, and another good pinch of salt. toss it all together until combined. pull the potatoes from the oven, and add the broccoli (or romanesco) to the tray. roast for another 8-10 minutes, until the broccoli (or romanesco) is tender; and the potatoes and onions are lightly browned and edges are crisp.

  3. let the veggies cool slightly while you prepare your bowl. if you’re smearing your bowl with sauce (alternatively, you could serve the roasted veggies with a side of sauce), add half the sauce to a large shallow bowl, and use a large spoon to spread the sauce into the bottom and sides of the bowl,. add the veggies to the center. top with the chopped mint, chopped parsley, and crumbled vegan cheese (if using).


similar recipes:


everyday roasted veggies

everyday roasted veggies

warm fingerling potatoes w/ garlic turmeric sauce

warm fingerling potatoes w/ garlic turmeric sauce